What is Avalanche Evergreen infrastructure?
Avalanche Evergreen is a permissioned Layer 1 framework built for institutional blockchain deployments. Unlike public subnets, which operate as open networks, Evergreen L1s are customizable, private chains designed to meet strict regulatory and compliance requirements. This infrastructure allows enterprises to maintain full control over network governance, validator sets, and data visibility.
The platform provides a suite of tooling and deployment options that address company-specific considerations. By leveraging the underlying Avalanche consensus, institutions can achieve high throughput and finality without exposing sensitive transaction data to the public internet. This distinction is critical for financial entities that must adhere to data sovereignty laws and internal security protocols.
This approach separates institutional operations from the broader crypto ecosystem, reducing counterparty risk and regulatory uncertainty. For developers, it means deploying a blockchain that functions like a public network in terms of performance but operates with the access controls of a private database. This foundation supports everything from tokenized assets to private settlement layers, ensuring that the infrastructure scales with the institution's needs rather than forcing them to adapt to public network constraints.
Assess your compliance and privacy needs
Before writing a single line of subnet code, you must define the permissioning and privacy boundaries. Institutional deployments differ fundamentally from public chains because they require strict identity controls and data confidentiality. The Evergreen framework is built specifically to support these permissioned use cases, allowing you to restrict who can propose blocks, validate transactions, or even read chain state.
Start by mapping your regulatory obligations. If your institution handles sensitive financial data, you will likely need a private data layer. Avalanche supports private VMs that encrypt transaction payloads, ensuring that only authorized participants can view the underlying data while the network still verifies the consensus. This separation is critical for maintaining audit trails without exposing proprietary information to the broader network.
Next, determine the scope of your validator set. Unlike the public Avalanche C-Chain, which is open to anyone, an Evergreen subnet allows you to curate a specific group of validators. This could mean limiting participation to internal nodes, trusted partners, or regulated entities. Defining this group early dictates your consensus configuration and the security model of your subnet.
Finally, consider the legal implications of data residency. If your institution operates across multiple jurisdictions, ensure your subnet architecture allows for localized data storage or compliance with specific regional laws. This assessment should happen before you select your VM type, as changing privacy layers mid-deployment is complex and costly.
Set up the Spruce testnet environment
Before committing to mainnet infrastructure, you need a sandbox that mirrors production constraints without risking real capital. The Spruce testnet serves as that environment, allowing institutional developers to prototype Avalanche Evergreen subnets with full control over consensus parameters and validator sets.
This phase focuses on accessing the portal and configuring the genesis block. You will define the initial validator nodes and set the economic parameters that govern the subnet's behavior. Treat this as a dry run for your deployment architecture.
Navigate to the official Evergreen portal at evergreen.avax.network. This dashboard is your entry point for managing subnet lifecycles. Ensure you have the necessary API credentials configured in your environment variables before attempting to interact with the testnet APIs.
Define the genesis configuration file that establishes the subnet's initial state. This includes setting the initial validator list, staking thresholds, and reward mechanisms. Accuracy here is critical; errors in the genesis block require a full redeployment and cannot be patched incrementally.

Spin up the first set of validator nodes using the configured genesis data. These nodes form the consensus layer of your Evergreen subnet. Monitor the boot process to ensure all nodes synchronize correctly and reach consensus before proceeding to application layer testing.
This setup provides the foundational infrastructure for your Evergreen subnet. Once the validators are synchronized, you can proceed to deploying smart contracts and testing transaction throughput under controlled conditions.
Configure custom virtual machines and rules
Customizing the Virtual Machine (VM) is where you define the specific logic and rules for your institutional subnet. Instead of building features from scratch, you leverage Avalanche’s modular architecture to create a purpose-built environment for assets like tokenized securities or real-world assets (RWA). This customization happens at the core level, allowing you to dictate how transactions are processed and validated before they ever hit the consensus layer.
1. Select the base VM template
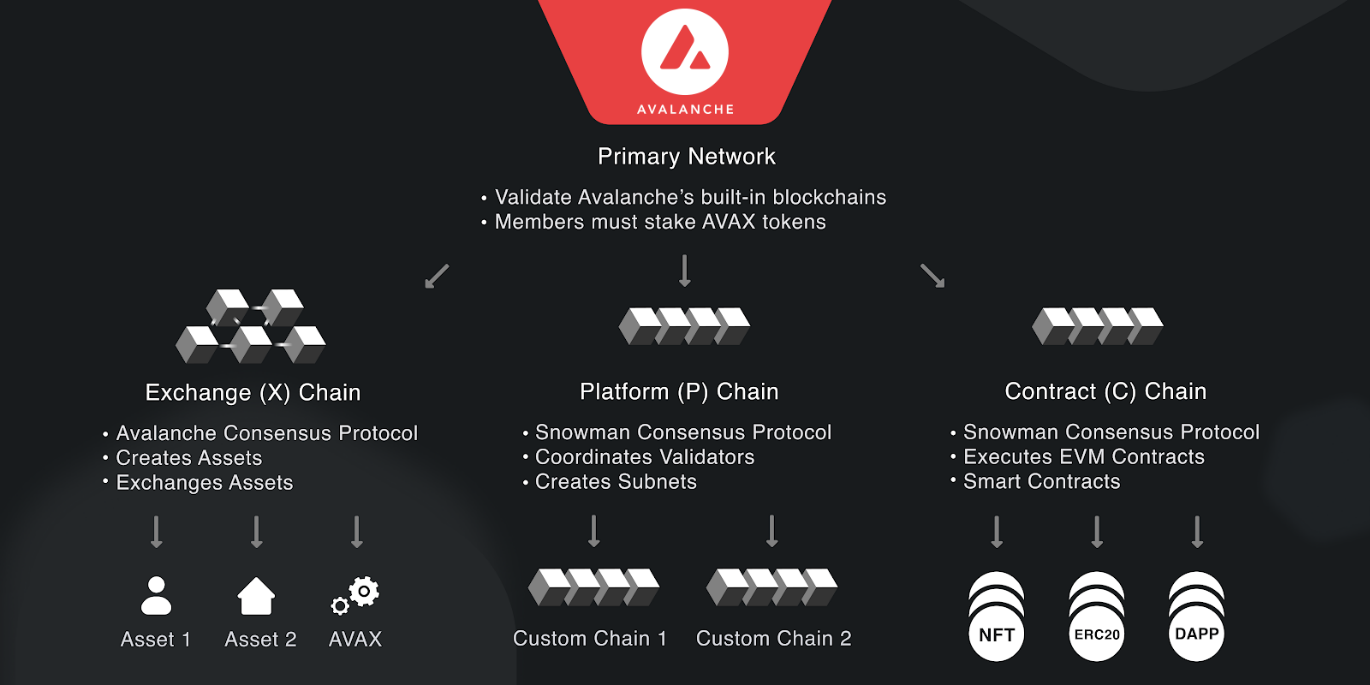
Start by choosing the foundational VM that aligns with your asset class. For most institutional use cases involving tokenized assets, the Platform VM (P-Chain) serves as the control plane, while the Exchange VM (X-Chain) or Contract VM (C-Chain) may serve as execution layers depending on whether you need native token support or smart contract capabilities. For specialized RWA needs, you might fork the Security Token VM (S-Chain) or build upon the Coreth engine used by the C-Chain, adding custom precompiles for compliance checks.
2. Define custom precompiles and state
Precompiles are the heart of VM customization. These are smart contracts that run at the protocol level, offering high performance for complex operations. For institutional compliance, you can implement precompiles that enforce Know Your Customer (KYC) status, transfer restrictions, or dividend distributions. By moving this logic into the VM rather than relying solely on standard Solidity contracts, you ensure that every transaction is validated against your rules before being committed to the blockchain.
3. Configure consensus and validator rules
Once the VM logic is set, you must define how the network agrees on the state. For an institutional subnet, you typically want a Proof of Authority (PoA) or a permissioned validator set. This allows you to control who can propose blocks and validate transactions, ensuring that only trusted entities participate in consensus. You can configure the number of validators, their staking requirements, and the block time, giving you a predictable and high-throughput environment suitable for financial settlements.
4. Integrate with Avalanche Core
The final step is integrating your custom VM with the Avalanche Core node software. This involves compiling your VM code into a shared library and configuring the node’s genesis file to point to your custom VM. The node will then handle the networking, state synchronization, and consensus mechanics, while your VM handles the application-specific logic. This separation of concerns is key to Avalanche’s scalability, allowing you to upgrade your VM logic independently of the underlying network infrastructure.
Choose the foundational VM that aligns with your asset class. For most institutional use cases involving tokenized assets, the Platform VM (P-Chain) serves as the control plane, while the Exchange VM (X-Chain) or Contract VM (C-Chain) may serve as execution layers depending on whether you need native token support or smart contract capabilities. For specialized RWA needs, you might fork the Security Token VM (S-Chain) or build upon the Coreth engine used by the C-Chain, adding custom precompiles for compliance checks.
Precompiles are the heart of VM customization. These are smart contracts that run at the protocol level, offering high performance for complex operations. For institutional compliance, you can implement precompiles that enforce Know Your Customer (KYC) status, transfer restrictions, or dividend distributions. By moving this logic into the VM rather than relying solely on standard Solidity contracts, you ensure that every transaction is validated against your rules before being committed to the blockchain.
Once the VM logic is set, you must define how the network agrees on the state. For an institutional subnet, you typically want a Proof of Authority (PoA) or a permissioned validator set. This allows you to control who can propose blocks and validate transactions, ensuring that only trusted entities participate in consensus. You can configure the number of validators, their staking requirements, and the block time, giving you a predictable and high-throughput environment suitable for financial settlements.
The final step is integrating your custom VM with the Avalanche Core node software. This involves compiling your VM code into a shared library and configuring the node’s genesis file to point to your custom VM. The node will then handle the networking, state synchronization, and consensus mechanics, while your VM handles the application-specific logic. This separation of concerns is key to Avalanche’s scalability, allowing you to upgrade your VM logic independently of the underlying network infrastructure.
Validate node operations and security
Before opening the network to institutional capital, you must ensure the underlying infrastructure is hardened. This phase shifts focus from development to operational readiness, emphasizing validator selection, key management, and security auditing.
Select and vet validators
Avalanche’s Evergreen Subnet allows you to define the validator set. For institutional use, this is rarely a public, permissionless set. You will likely configure a permissioned set of validators that meet your organization’s compliance and security standards.
Ava Labs provides the tooling to customize these parameters, but the operational burden falls on you. Ensure each validator node is hosted in a secure, redundant environment. Verify that the nodes are running the latest stable version of the Avalanche software to patch any known vulnerabilities.
Manage keys and access
Key management is the most critical security vector. Institutional operators typically use Hardware Security Modules (HSMs) or cloud-based KMS solutions to store validator keys. Never store private keys on standard development machines or in plaintext configuration files.
Implement a strict key rotation policy. Define who has access to sign transactions and when keys must be rotated. This limits the blast radius if a single key is compromised.
Final security audit
Before mainnet launch, conduct a comprehensive security audit of your subnet’s configuration and smart contracts. Use automated tools to scan for common vulnerabilities, but also engage a third-party security firm for a manual review. This step is non-negotiable for institutional trust.
Launch and monitor the Evergreen subnet
Deploying an Avalanche Evergreen subnet moves your infrastructure from a test environment to a production-grade L1. This process requires coordinating with Avalanche’s core team to finalize validator selection and security parameters before the chain goes live. Once deployed, the focus shifts to continuous monitoring to ensure the subnet meets institutional standards for uptime and compliance.
Contact the Avalanche Evergreen team to initiate the deployment process. You will need to provide detailed specifications regarding your validator set, gas limit preferences, and any custom virtual machine requirements. This step ensures your subnet is tailored to your specific institutional workload and security needs.
Select your validator nodes and define the security parameters for your subnet. Unlike public chains, Evergreen subnets allow you to curate the validator set, giving you direct control over who participates in consensus. Ensure your validators are distributed across different cloud providers to minimize single points of failure.
Once approved, your subnet is deployed on the Avalanche mainnet. Verify the genesis block and initial state to confirm that all smart contracts and pre-deployed assets are correctly initialized. Use block explorers to monitor the first few blocks and ensure consensus is functioning as expected.
Set up real-time monitoring for block production, transaction latency, and validator health. Institutional deployments require strict SLAs, so configure alerts for any anomalies in consensus or network performance. Regularly review validator performance metrics to maintain optimal network stability and compliance.
Common questions about Evergreen deployment
Developers often hit friction points when moving from testnet experiments to institutional-grade Evergreen subnets. Below are the most frequent technical and operational questions, drawn from official Ava Labs documentation and community discussions.
These questions highlight the core trade-off: Evergreen sacrifices public permissionlessness for institutional control and predictability.
No comments yet. Be the first to share your thoughts!